Review: Britemax Easy Cut and Final Shine Metal Polishes

I received these products at no charge from Autogeek, and in return, I agreed to provide a review. I will try to keep this as objective as I can.

Abbreviated copy from AG

Britemax Easy Cut is a heavy-cut metal polish that is highly effective and user friendly! This unique formula is perfect for removal of light to heavy oxidation and everything in between. Britemax Easy Cut features a blend of solvents, chemicals, and fine abrasives to create a product that is easy to use and yields amazing results. 

Britemax Final Shine Metal Polish & Sealant quickly and easily removes light oxidation and staining from your vehicle’s metalwork leaving a mirror-like shine behind. The unique, easy to use formula not only cleans and polishes, but also protects, depositing a layer of protection with each application. Britemax Final Shine Metal Polish & Sealant provides an easy way to restore the like-new look of your vehicle’s metal surfaces. 


I've been a huge fan of Pinnacle Exhaust Cleaner and Brightener since I first got ahold of it.   Before that, I was using S100 Polishing Soap.  Both of these are able to clean well and add a good shine to exhaust.  My gripe with S100 has always been the abrasives, I've very careful not to get them on surrounding areas for fear of causing damage.  Pinnacle does not have this issue with the cream like consistency, and it wipes off easy from anything adjacent. Both Britemax products seem to have an abrasive component that separates form the carrier liquid, I am still careful with surrounding areas, but the Easy Cut arbasives seem to stay within the suspension well.  The Final Shine abrasives seem to come out of suspension much easier, but not be problematic with adjacent areas.  

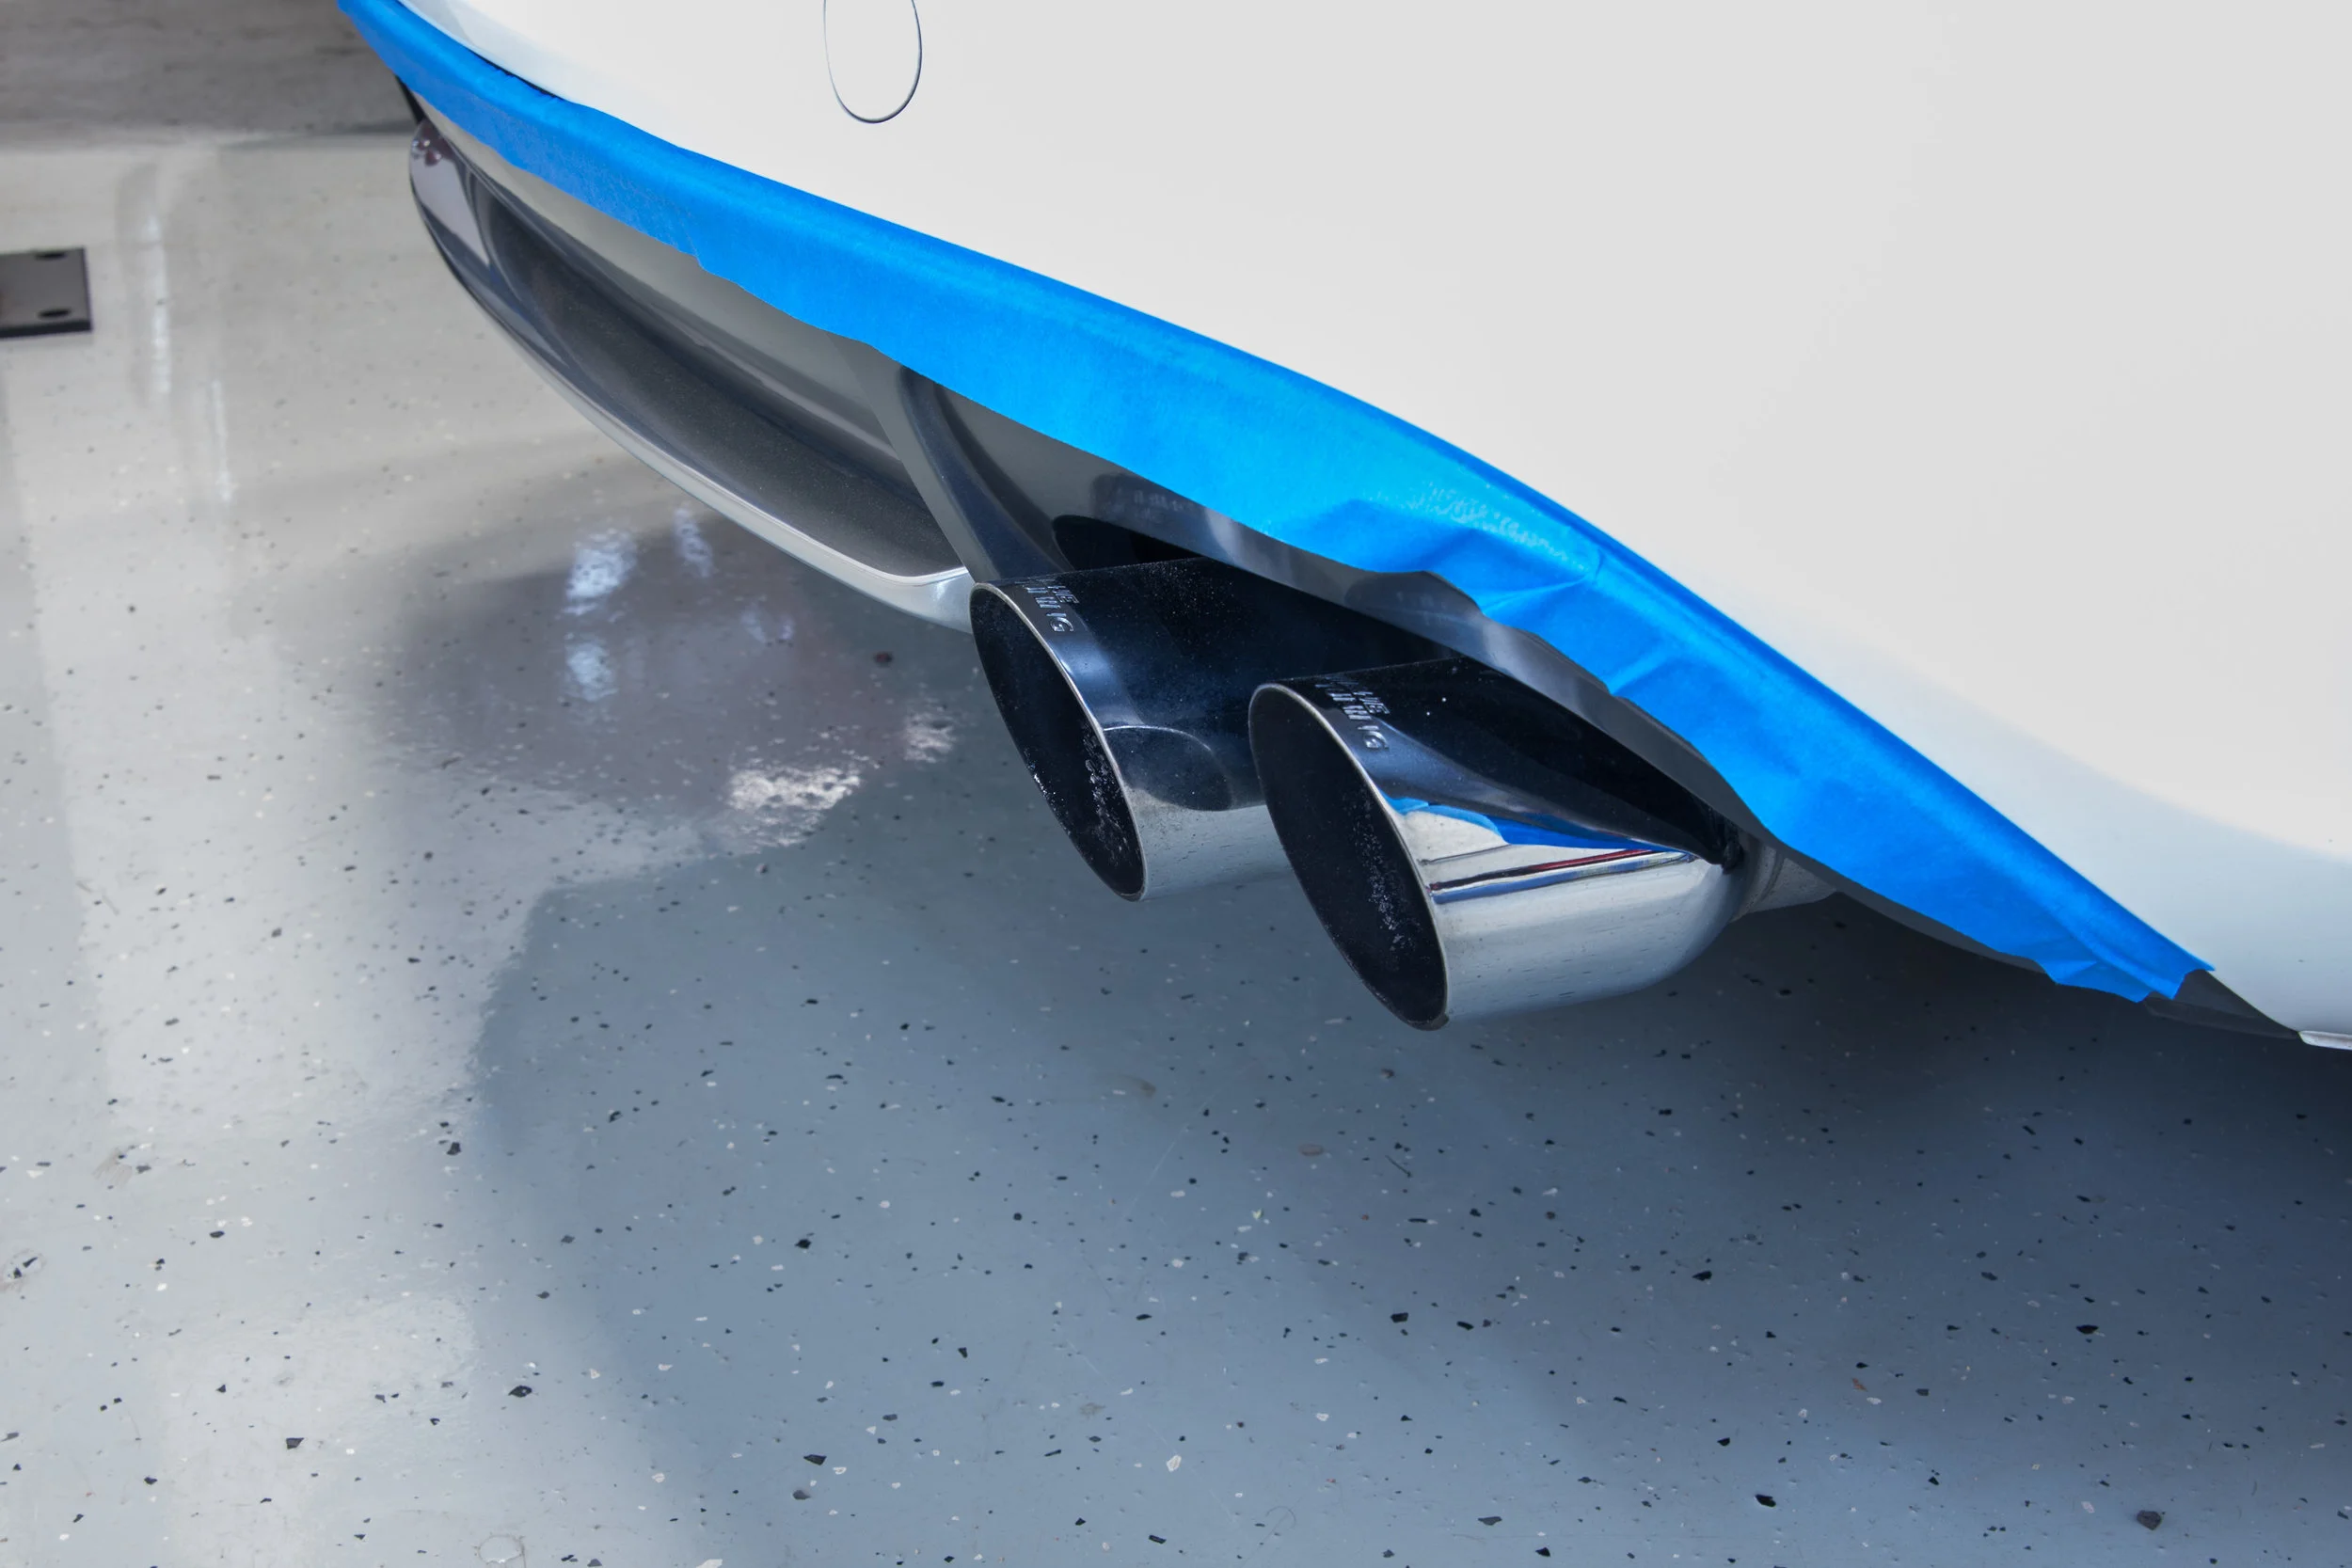
Both products are very runny, I wouldn't use an older terry towel and this stuff will seep right through, use a new terry or an older, disposable microfiber.  Below is a picture of the subject's AWE exhaust tips.  The client had already washed and clayed the car before I arrived.  He does take decent care of the exhaust, at least in cleaning it.  He requested that I take care of the outside of the tips, but nothing necessary for the inside.  

Initial condition.  Clean and somewhat shiny, but oxidation is visible and there is room for improvement.

Britemax Easy cut was applied to a microfiber and worked in by hand.  As previously mentioned, the product is very runny and even though these tip were pretty clean, the nickel size amount was only enough for a one of the four tips.  Enough grime and oxidation was removed to render that portion of the microfiber towel spent. Maybe that's not the greatest in terms of product efficiency, but I think it speaks to the effectiveness of the product.  I've used similar products that would have used less in a single application, but would have required two application to get the same amount of crud off.  The instruction state to wipe off after it hazes, that did take a while.  A long working time is good, but I through all 4 tips and the first one still hasn't flashed completely.  Quick to remove crud and slow to flash.  

After application of Easy Cut, the oxidation and bonded contaminants have been removed and the tip and nice and shiny.  

Now that the crud is off, I took a shot with final shine to see if we could extract any more shine.  Final shine does have a sealant in it as well as removing light oxidation.  Final shine was applied in the same way.  I think the abrasives are a bit larger and were more easily deposited on the surface of the tip, which requires some extra diligence in removal.  Final shine is the same runny consistence as easy cut.  This does allow it to spread well and is easy to work.  It did not gum up the towel as fast, likely because Easy cut got most of the crud off, but there was still evidence of transfer, so it can do some light surface cleansing by itself.  Final shine also has a long working time and took a while to flash.  I did get through all 4 tips and the first still hasn't flashed/hazed.

Pic after final shine.  There was a very slight improvement in person.  The camera barely pics it up.  To my eye, this may have just been a result of the sealant component of Final Shine. 

Both motorcycles and uncoated metal wheels, are great applications for the Britemax products, but even if you don't have one of these, there's a good chance you have an exposed exhaust pipe and both products did a very good job of making an improvement in these tips that were already in decent shape.

Final Thoughts:  I think that Easy Cut can stand alone as an exhaust treatment.  If someone was planning to apply a coating to the tips, then I feel like you could go straight to coating after East Cut and end up with a mirror finish.  If you are not planning to coat you tips, then you can follow up with Final Shine, or potentially use Final Shine alone, I'll need to play with it some more on nasty tips to see what it's limits are. 

2014 Jeep Wrangler Rubicon Polish and Silica Sealant

Despite having 8K miles and only being 3 years old, this car has been through some trying times.  The owner put some deeper scratches in the grill when removing the badge, the dealer put some nasty scratches on the hood that required a respray, the first paint shop couldn't get the texture right and washed the car with sandpaper. the second paint shop did an awesome job on the paint, but they weren't the best finisher and left a lot of holograms.  The goal here was to turn back the clock on the damage and then get the car sealed for the summer. 

  • Wheels and tires cleaned with Ardex Proper and Meguiars D108
  • Prefoamed with Angelwax Fast Foam
  • Hand wash with Carpro Reset
  • Mechanically decontaminated with traditional clay and ONR
  • Paint was polished with a Griots Correcting Cream on a Boss 21 with rupes yellow pads
  • Tight areas polished with Griots Correcting Cream on Adam's swirl killer mini with rupes yellow pad
  • Very tight areas were corrected with Rupes Nano and yellow rupes pad
  • Paint was protected Nanoceramic Easy Armor
  • Wheels were protected with carpro hydro2
  • Trim was protected with Wolfgang Exterior Trim Sealant

Review: Britemax AIO

I received this product at no charge, and in return, I agreed to provide a review. I will try to keep this as objective as I can.

Abbreviated copy from AG


Britemax AIO Max is an easy-to-use all in one product that corrects mild paint imperfections and adds a durable layer of protection to your vehicle. This highly-effective formula can be used as a standalone product, or as a second step on previously polished paint. Britemax AIO Max restores the beauty and shine that was hidden by light swirls and oxidation, and all in one easy step!

I realize that the $1k+ correction and coating jobs get a lot of attention, and rightfully so; who doesn't like 4 figures. But I still think the traditional AIO work is the bread and butter of detailing. They typically result in a huge turn-around, the non-geek is thrilled with the result, there is a great profit margin on them and a single guy can crank out at least 2, if not 3 in a day. I'll admit it is hard work and having a good polisher (or several) and an even better AIO is key to getting these jobs done efficiently. My go-to products have been D151 and HD Speed and you'd be hard pressed to find someone that doesn't put one of these two at or near the top of their list. Enter Britemax AIO max. As stated above, it will remove light swirls, which is a key factor for AIOs that I plan to use. It has a green apple fragrance that is awesome. It's somewhat runny compared to HD speed, so there is some potential to splatter, but in my experience that's also an indicator of a product that will be easy to wipe off, and this was very easy to wipe off. 

After using the PB super slick & foam on the GTI, we used a clay mitt and then taped things up partially in preparation for the AIO. I've done this car many times in the past and I'm well aware the paint is hard as nails. I chose to use the rupes UHS pads on a Boss 21. The UHS pads are very stiff, so I apply several sprays of water to the surface to soften the foam, I then use a towel to remove the majority of the water before starting. For whatever reason, HD speed does not like any water and becomes very hard to remove for me, not so with Britemax. I did one pass to spread the AIO, then 4 passes at speed 5 with medium pressure and arm speed and then a final pass at speed 3 with slow arm speed and no pressure. The polish wiped off with no effort.

before

before

after

after

I also used Britemax AIO on the gloss b-pillars with the nano and a rupes yellow pad. 1 pass to spread at 2 and 4 passes at speed 4. It obviously wasn't 100% and I didnt' expect it to be, but it was a respectable improvement for an AIO.

Before

Before

after

after

Finally, I used the Nano with blue pads on the mirror caps

Before

Before

after

after

Proof positive I used a rupes blue pad

Proof positive I used a rupes blue pad

Britewax AIO splatter wipes off super easy; you can see a couple streaks here after one wipe, after a final cleaning in prep for protectant, there was no discernible residue. 

Britewax AIO splatter wipes off super easy; you can see a couple streaks here after one wipe, after a final cleaning in prep for protectant, there was no discernible residue.
 

Chemically Stripping Wax

After trying my best to persuade an individual that dish soap does not strip wax, to no avail, I find myself compelled to provide some useful information regarding stripping wax.  This is a bit of a vent about the wive's tales and the way information has been twisted over the years.  Keep in mind that there is always some truth to these myths, but, as is commonly the case, the nature of the wive's tale is far from applicable to the current state of affairs.

This particular tale revolves around using dish soap to remove wax.  There are several theories that promote this opinion.  Below, we will explore these theories in detail and try to dispel the myth.

The first observation is that after using dish soap, the beading is gone, which indicates that the protection has been removed.  I think you'll find that even when used properly for washing dishes that water lies flat on the dish and sheets off.  This is a charactaristic that has been thoughtfully crafted into your dish soap.  It's advantageous to have water sheet of your dishes to prevent waterspots.  This is achieved through the use of surfactants.  These surfactants act the same way on your car's paint.  They sit on the surface and inhibit beading, but promote a sheeting action.  Since the wax that was on your paint beaded water, one may conclude that the wax is gone becuase of the change in the surface properties.  However, with the application of a mild solvent, such as isopropyl alcohol, one can strip the surfactants and find that the beading and wax still remain. 

The next theory is that the pH of the dish soap is much higher than the wax and this degrades the wax.  This may have been the case 30-50 years ago when dish soap contained strong alkaline constituents for cleaning purposes, but current dish soaps are near neutral in pH, if only slightly above pH 7 and as such, this is just plain wrong.  Moreover, plenty of bench and field testing has been done with modern protectants that shows high pH products such as APC, do not in fact remove the protectant.

The next argument is that dish soaps are more acidic that waxes and therefore remove them.  A simple check of the pH of common dish soaps will find that they are slightly above pH 7 and wax is typically around pH 8.  While the dish soap has a lower pH, is it not more acidic.  Since it is still above pH 7, it is merely less alkaline.  This is an important distinction in that, as above, even strong alkalines do not strip the wax.  If the pH is above 7, then the argument of it being more acidic is moot as it isn't at all acidic.   

So to put the wive's tales of dish soap to bed, I've placed both beeswax and carnuaba wax in a container with dish soap where it has undergone continuous exposure for 12 months.  The results?  See for yourself.  No visible change to the beeswax or the carnuaba wax.  If spending a year in dish soap hasn't broken down these common wax constituents, than good luck doing it in 30 minutes. 


Dishsoap upon application

Dishsoap upon application

Dishsoap 1 year later

Dishsoap 1 year later


The next argument is that solvents will remove waxes.  This has a bit more merit, afterall, there are solvents in paste wax to make it more malleable.  And there are plenty of solvents sold as 'wax and grease removers'.  But, those who have made a paste wax know that there are certain steps taken, like heating the solvent and the wax to obtain a smooth consistency.  Part of this is because of the much high ratio of wax to solvent; but the question is, at a much lower ratio, will the wax dissolve?  Again, see for yourself how they performed during continuous exposure to naptha over the course of 12 months.  The beeswax started to dissolve in 15 minutes.  By 3 hours there was not much left and at 30 hours, it was gone.  However, the carnuaba exhibited no change over the course of a year.

Wax upon application, beeswax already reacting

Wax upon application, beeswax already reacting

3 hours later, beeswax is dissolving, no reaction for carnuaba

3 hours later, beeswax is dissolving, no reaction for carnuaba

1 year later, carnauba still hanging in there

1 year later, carnauba still hanging in there


For the conclusions of this exercise, we will assume a very basic wax formulation of solvent, carrier (heavy distillates) and waxes (beeswax and carnuaba).  It should be noted that you may also find other additives like cetyl esters and siloxanes in a normal wax formulation. We can expect that the solvents will evaporate very quickly upon initial application of wax and the carriers will evaporate relatively slowly, but one could expect them to be gone by the time we try our first wash (perhaps a week after application).  So what we are left with is beeswax and carnuaba wax forming a mechanical bond (entanglement) to the vehicles surface.  

When we apply a dish soap, we can expect no chemically related degradation of the beeswax or carbuaba.  But we can expect that the surfactants will modify the surface properties to make water lay flat and give the appearance that the wax is gone.  But removing the surfactants will result in the surface properties being miraculously restored.  

When we apply a solvent, we can expect some of the beeswax to be dissolved and if left long enough, perhaps all of it, but the carnuaba will be unaffected.  This suggests that while solvents will degrade wax, there is a limit to the degradation.  Once all the beeswax is gone, then you are left with the carnuaba and solvent initiated degradation would cease.   

So if the chemicals discussed about won't remove wax, what if we use a mechanical method.  How about a clay bar?  Is a clay bar actually abrasive?  Sure it is, but it's not substantially abrasive on it's own.  I would caution against using it for the explicit purpose of wax removal.  What it is very good at the shearing the surface.  Anything sticking up beyond the normal plane of the car will be picked up by the clay.  Think of it like shoveling snow.  Your shovel will pick up the snow and if there is a rock sticking up from the pavement it will probably catch that and bring it with.  In the case of the shovel, it's carrying the rock above the ground surface.  In the case of clay, it's absorbed into the clay and now being rubbed against the paint, this makes the clay more abrasive.  Still thinking about shoveling snow, what happens when we reach a sheet of ice on the surface?  Do we pick it all up?  Rarely, more often we pick up a portion and the shovel continues to glide over the ice scouring the top.    

So how can we actually strip wax?  Mechanically.  If you are in a position where you need to be absolutely sure the wax is gone, it should be polished off.  A very mild abrasive polish will be capable of removing the layer of wax and also refining the paint finish and removing ingrained dirt in the paint finish.  This is a time consuming step compared to everything mentioned above, but it is the method to ensure removal.       

2016 Audi S6 wash decon and wax

The owner purchased this car new about 16 months ago and has decided it just does not suit his needs.  I was asked to get the exterior prepped for sale.  Because it has only seen 16 months of exposure and will be changing hands soon, a paint correction on the whole vehicle was not warranted, but there were a few blemishes that needed to be addressed.  The sun was fading fast so not nearly as well documented as normal.

 Process

  • Wheels and tires cleaned with Ardex Proper and Meguiars D108
  • Prefoamed with Angelwax Fast Foam
  • Hand wash with Carpro Reset
  • Mechanically decontaminated with traditional clay bar and ONR
  • Spot Compounded with Flex kompakt, orange foam and M100
  • Polished with Adams swirl killer mini, rupes yellow and menzerna final finish
  • Body Prep wipe down was performed with Prep-Sol
  • Paint was protected with Nano Ceramic Easy Armor
  • Wheels were protected with carpro hydro2
  • Exhaust was polished with Pinnacle Exhaust cleaner and brightener
  • Trim was protected with Wolfgang Exterior Trim Sealant

2003 Audi RS6 Paint Correction & Coating

The owner of this vehicle recently purchased it after it sat outside for 4 years with infrequent use and even less frequent cleaning.  Audi paint of this vintage is well known for hard clearcoat and this was no exception.  Add the years of neglect and the brilliant black paint that shows everything and this car is a tall order.  It also was exhibiting a common issue from this vintage where old factory tape mark appear years later having altered the paint texture deep into the finish, this is a very deep defect and require some patience, skill and knowing when to yield.

Process

  • Wheels and tires cleaned with Meguairs D140 and Meguiars D108
  • Prefoamed with Angelwax Fast Foam
  • Hand wash with Carpro Reset
  • Mechanically decontaminated with clay mitt and Reset
  • Compounded with the following combos: Rotary and wool with meguiars M100, Boss 21 with Boss fast MF pads and fast correcting cream, Flex kompakt with wool and M100
  • Tape marks were thinned with the flex kompakt, denim pads and meguiars M100
  • Polished with the following combos: Boss21 with Rupes yellow and Menzerna final polish, Adams swirl killer mini, rupes yellow and menzerna final finish, flex kompakt, flex black pad and menzerna final finish
  • Body Prep wipe down was performed with Prep-Sol
  • Paint was protected Gtechniq EXO
  • Tires were dressed with carpro PERL
  • Wheels were protected with carpro hydro2
  • Exhaust was polished with Pinnacle Exhaust cleaner and brightener
  • Trim was protected with Ultima Tire & Trim Guard
  • Engine with clean with Zep Citrus via Tornador black
  • Carbon Fiber covers were corrected with the Rupes Nano
  • Engine Protected with 303AP

Lamborghini Huracan PPF Prep

The owner of this car recently acquired it with only 1000 miles on the clock.  The previous owner was very particular about it and had it detailed prior to selling.  Upon a cursory inspection, the paint was in relatively good condition with some minor swirls throughout and a few deeper scratches.  Unfortunately, neither the previous owner, nor his detailer addressed the plethora of sanding scratches throughout the body and most evident on the front bumper. Since this vehicle will be getting a PPF on the front clip, the focus was to get these pieces perfected before the film, then finish up the work after the film is installed.  This ensures that if anything happens to the paint at the PPF installer, it can be resolved without taking any additional clearcoat. 

Process

  • Wheels cleaned with Meguairs D115
  • Hand wash with Optimum No Rinse
  • Mechanically decontaminated with traditional clay bar and Optimum no rinse
  • Paint was compounded with Meguairs M100 and the following combinations: Boss21 with Megs MF, Adams Swirl Killer mini with LC MF pad, Flex Kompakt with flex orange foam 
  • Paint was Polished with Menzerna Final Polish and the following combinations: Flex 3401 and LC hybrid white, Rupes ibrid nano with yellow rupes pad
  • Paint was protected with meguairs D156 (only short term protection due to PPF)


Example of sanding scratches on lowest part of bumper

Example of sanding scratches on lowest part of bumper

sanding scratches removed, but a lot of texture still remains in the paint

sanding scratches removed, but a lot of texture still remains in the paint

After trying the 12mm mini DA with a microfiber pad, some of the sanding marks still remained, I switched up to the flex rotary with a foam pad and that knocked them out in short order. These are extremely intricate pieces and a single tool approach would not have yielded satisfactory results.  Having a wide range of machines, pads and polishes allows me to get into nearly any area with a machine to produce superior finishes.  I'll be back to finish this one out once the PPF is installed.  


2010 Audi A4 Cabriolet Polishing and PPF removal

I did this vehicle in the fall for the owner.  At that time we discussed the potential for doing a paint correction, but I advised that we wait until spring when he could get the most out of it.  However, the 2.5 year old clearbra looked terribly hazed and splotchy so I did try to clear it up with some polishing.  Fast forward to spring and the car wash ready for a paint correction and the clearbra has started to deteriorate again, so it was time to remove it.  The vehicle was full of swirls and waterspots and because this is a daily driver and likely to experience similar treatment in the future, we elected for a single intensive polishing step to remove a majority of the defects while preserving the clearcoat. Despite this being a premium film done by a very experienced installer, it had clearly hazed and yellowed over the course of 3 years. This is an instance of managing expectations.  If an owner understands that PPF has a finite life and needs to be maintained and replaced, then the product is much more likely to have a successful lifecycle. 

Process

  • Wheels and tires cleaned with Meguairs D140 and Meguiars D108
  • Prefoamed with Angelwax Fast Foam
  • Hand wash with Carpro Reset
  • Mechanically decontaminated with clay mitt and Reset
  • Paint was polished with a Blackfire SRC Compound on a Boss 21 with rupes yellow pads
  • Bumpers were corrected with a Flex 3401 and LC white hybrid pad
  • Tight areas were corrected with Rupes Nano and yellow rupes pad
  • Paint was protected Gyeon Cure
  • Tires were dressed with carpro PERL
  • Wheels were protected with carpro hydro2
  • Exhaust was polished with Pinnacle Exhaust cleaner and brightener
  • Trim was protected with Wolfgang Exterior Trim Sealant


2013 Audi Allroad Spring Prep

In the fall, I applied a self-healing coating to this car, you can find the original post here.  Now that spring is closing in, it was time for a clean-up.  The car has been well cared for, but the owner did take it to one touch car wash inadvertently.  Fortunately, the self-healing coating took most of the brunt.  No polishing was necessary, the coating was corrected with the help of a heat gun and IR lamp.  The car also had a bumper to bumper accident.  Literally, the owner hit a loose bumper on the road!  The Xpel Ultimate PPF took much of the damage, but the bumper was left with a 6-faced crack and the PPF was penetrated and started peeling back.  To reduce the appearance of the defect, the loose film was cut back on the car, this is not advised unless you are sure handed and patient enough not to cut the paint.  

Process

  • Wheels and tires cleaned with car soap (both are coated)
  • Prefoamed with Angelwax Fast Foam
  • Hand wash with CG citrus wash daily
  • Mechanically decontaminated with traditional clay bar
  • Tar deposits removed with carpro Tar-X
  • Protection was fortified with Angelwax Ti-22
  • Exhaust cleaned with pinnacle exhaust cleaner and brightener
  • Engine was cleaned with a Tornador gun, Steam machine, various cleaners and brushes. 


2008 Honda Odyssey Interior

I take a lot of pictures of pretty paint, and sometime I show pictures of an interior.  Sometimes I think there is a perception that all I do is paint.  While I am very good at paint, that shouldn't overshadow what can be done to an interior.  Afterall, you spend your time inside the car, not outside. So while the interior jobs aren't as glamorous and don't always make for the great photos, I do them, and I do them well.

In this case, the owner had just acquired the vehicle from a family member.  It likely hasn't been detailed ever in it's life.  It's been used to haul grandchildren, pets and all manner of travel gear.  The owner wanted a fresh start with the car.  There were not too many stains, so we elected for a mid-level service to restore the interior.

Process

  • Carpets dry-brushed, vacuumed and steam cleaned
  • Leather was vacuumed, steamed and an all purpose cleaner was used in heavily soiled areas
  • Leather was protected with McKee's Leather Lotion
  • Hard surfaces were steamed and an all purpose cleaner was used in heavily soiled areas
  • Hard surfaces were protected with Blackfire Interior Protectant
  • Headliner was spot cleaned with a dedicated self-neutralizing upholstery cleaner
  • Fabrics were protected with Carbrite carpet protectant
  • Gass was cleaned with Blackfire glass cleaner
  • Stains were spot treated with specific chemistry for each stain and extracted
  • Mats were treated with a traffic lanes cleaner and extracted